} -->

Monday 25 September 2017

How to Leave Work On Time!

I get to work 30 minutes before the kids are allowed to begin entering the room (mostly just to get good parking). I leave ten minutes after the bell has gone and I rarely do work at home.

Today I'll show you how to do the same!


Control Your Mindset
The first one is your mindset!
As a teacher we can NEVER get EVERYTHING done! We can get a lot done and we can do an amazing job with whatever time we have, but we CANNOT do everything!
Our own lives and our families do not and should not have to suffer for our job.
In any job there is always MORE we COULD do. Once we accept this fact we'll be more content with what we do get done. We need to focus on the things that make the biggest differences and impacts.

Prioritise 
We need to focus on what will make the biggest differences and impacts on our students and prioritise those.
We also need to decide the priority of different aspects of our lives.
If I feel like I am behind I will work during my lunch hour (I say hour but its more like 35-40 minutes). I would rather lose time slowly eating my lunch or talking to my colleagues than lose time at home. Read more on prioritising here.

Maximise your Prep Time
I maximise my DOTT time (prep time). You can read all my tips on this in the blog post on Maximising Your Planning Time I did a while back, but in summary- plan out your planning time, don't get distracted by anything and have a schedule for each of your DOTT days. On Mondays I prepare reading groups and other weekly routine items that need changing out. On Tuesday I mark and file. On Wednesdays I plan for the following week and on Thursday I prep worksheets and resources and do photocopying. Knowing exactly what I am going to do and lumping things together saves SOOOO much time!


Get organised! 
Set your classroom out in a way that works efficiently so that everything becomes easier.
For me that's a set of draws with all my items for the week, a place to put marking/items to be glued and items still in process, a clip board with assessments I am in the process of doing and a file with templates, a file with assessments and a file with all my planners and related resources ready to go.


Plan well! 
You can read my blog article here on my Planning Documents.
Plan out your term at the start and you won't have to spend time later wondering what to teach or constantly referring back to the curriculum.
You can still have room to alter things if the students take you in a different direction or have different needs but a good plan in place will help you know where you are heading.


Identify your weaknesses and strengths 
Find ways to use them to your advantage or work around them. If your weakness is coffee and you end up getting caught up in the staff room gossiping too much then consider having a kettle in your room.
If planning isn't your strong suit consider making your life easier and purchasing pre-planned units and work. If resource creating is too complicated or time consuming, search for the resource you need online.

I have planners for Years 1-6 for writing text types, Health, HASS and more. Check out my stores:
Teachers Pay Teachers
Designed By Teachers

If you have a strength in working with others consider team planning. You break up the lessons/subjects/units between your colleagues and then swap.


Cut Down your Marking
You don't need to mark every single error on every single piece of work!  Seriously, you don't!
If it isn't a specific writing task let spelling errors and missing punctuation go....the likelihood of students looking at them again is slim. The chance of parents looking at them is even slimmer.

Marking keys can make marking quicker, using stamps or a basic tick can also increase flow. I find it better to give students immediate verbal feedback on most things so I use my verbal feedback stamp. Some worksheets are pretty cut and dry so I just glance and stamp.
Get students to mark their own work at the end of the lesson if possible.


Not everything has to be assessed every day of every week- get a rotation going of what you are assessing to keep your workload down.

Optimise Small Chunks of Time
Set aside the last hour or half hour of the week for finishing off time for the students and YOU.
Use this time to finish things off like assessments while the students work on what they need to finish.

Make use of student down time to get things done. I have students tell news all on one day. That gives me a solid half an hour to do student writing conferences and mark their diaries. During silent reading I do one-on-one assessments such as running records.

Before school, do any last minute prep for the day.
Before leaving school ensure your classroom is clean. I do the bulk of the cleaning while my kids are packing and stacking. Learn to direct your students as you yourself are packing up. Organise your desk, put things back where they belong. An organised classroom means everything is easier to find and you don't waste time searching. If I have any extra time in the 10 minutes before I leave school then I do some quick tick marking from the day or get ahead on filing.


Start Jobs Early
When things are due such as reports, start on them early! Leaving them till the last minute will make you feel rushed and unprepared. Read more on Making Report Writing Easier here. 

Don't Reinvent the Wheel
If you are in your first few years of teaching you will naturally have to spend more time as you build up a repertoire of resources and plans. Stick in there, each year will get less and less time consuming! Make sure anything you make or plan is going to be useful and obtainable the following year.
Make files on your computer for each subject and mini files within those. This also works for lever arch files and page protectors. Sometimes I go back looking for things from my weekly planners from my first year of teaching or resources I created then. I am often disappointed when I can't find something or my plans weren't detailed enough that I can't actually remember what I did.

So now you need to put all of this into action. Choose what you want to priorise, choose the times you would like to start and leave work and work out what actions you can put in place to get you there.
Try not staying back late for a week and see that the world doesn't tumble down!

Good luck!


 ⇨ Like us on Facebook ⇨ Follow us on Pinterest


Thursday 31 August 2017

Five EASY Lessons to Leave for a Relief Teacher

Often when relief teachers have to take our class we don't get much of a heads up, whether we are sick or have a scheduled meeting or maybe even a pleasant surprise of extra DOTT!

When this occurs it may not be practical for the teacher to just continue your normal lessons, especially if they require something you haven't fully prepared or is just to 'messy' to leave in the hands of someone who just isn't you.


These activities involve NO PREP, can be easily adapted to ANY YEAR level, require minimal resources (if any) and will be ENGAGING and have education value to the students. 

While there are some very special relief teachers who will come prepared with their own lessons, you still need to have lessons prepared in case they don't.
I leave a note for my relief teacher that tells them where to find my timetable for the day and class routine information. On the note I leave 5 optional activities in case they need it and they are so easy and fun that I wanted to share them with you today so you can use them too!

1) Foldable Monsters
This is my go to lesson when I need something quick. Hand out an A4 piece of paper. Fold into 3 sections (the more equal the better but it is not crucial). Take the top section and have students draw the head of a creature then fold and ensure the neck lines cross down into the second section. Fold so the top section is not longer visible, Collect and randomly redistribute. The second person draws the body including arms but not legs, they must extend the torso lines down to the next section. Fold out of the way, collect and randomly redistribute. They then draw the legs and open up to reveal the monster. Do a gallery walk to see all the creations! As a follow up students can write a descriptive writing piece or a story about their create of a profile.


2) Would you Rather Questions
There are so many activities you can do with would you rather question and students LOVE every single one!


Here's an example you can use with the questions above.

Speech Bubbles 
Present a question and allow students to write their reasons for picking a particular side and write onto a speech bubble (key words or sentences depending on age and time allowed) and then put these up on display. This encourages natural classroom conversation and debate as students visit and read the display.

Find more questions and activities in my Would You Rather Pack or read my blog on Would You Rather Activities for more ideas. 

3) Where's the Teacher?
I don't know whether this one is more fun for the students or for you to read when you get back! Students are asked to write a creative narrative piece about why their teacher isn't at school/in the classroom. Unique and funny ideas are to be encourage along with a reminder to use the correct structure of a story (beginning, middle and end). If there is spare time students should definitely read them to their peers or add pictures!

4) Before and After Reading Activity
Show students a non-fiction book and discuss the topic of the book. Have them brainstorm their current knowledge of that topic. Depending on their year level you might do this together on the board or have them divide a page into thirds and write it in the first third.
Read the book. After you have finished get students to record the information they know have about the topic. Then ask them to write any questions they know have. These may become research questions as another activity.
You can find the template above in the pack below:


5) My Numbers
Give students a sheet of paper and have then draw a circle in the middle and then divide the rest of the paper into sections stemming from the middle (or provide them with a template).
Students think of numbers in their life and complete a section for each. For example their age, number of siblings, year born etc. Lower primary students can simply write the number while older students can make up equations that have to be solved to work out the number. Students can fill up the rest of the space with a picture.


You can get the blank template above and one with prompts already included in this pack.


So the next time you are away, chuck a few of these lessons in and relax!

Sunday 23 July 2017

How to Cut Down on Photocopying

Schools seem to be cracking down more and more every year on how much they allow teachers to photocopy. So here are some tips from the person with one of the lowest photocopy tally in their school

Before photocopying anything ask yourself these questions:
1) What do my students get out of this sheet?
2) Could I do it another way?
3) Does the sheet have to be this size? 

What do my students get out of this sheet?
Not every lesson needs a worksheet. Ask yourself what purpose does this sheet serve? Is it just proof that a lesson was done? Is it just work to keep your students busy? You might not need a worksheet at all. Here are some alternatives:
  • Whenever possible activities should be hands on- its how students learn best. See if there is a way you can turn the activity into something they can get up and do. 
  • Another meaningful activity is when people cooperate and collaborate. Try doing the activity as a discussion.

Could you do it another way?
Do the students need the worksheet or could they make their own version/template?

  • Instead of just photocopying a page you could get students to rule/draw/fold in their exercise book. If you take the time to teach your students how to fold pages, rule lines etc. each time they draw up a template they will get quicker and quicker. For the really slow ones I usually use their book as the demo for the rest of the class.
  • If you don't need a physical record of the activity try getting them to do it on mini whiteboards, blackboards or scrap paper.
  • If it is a template you use often or even every year why not laminate the page? Students can write over the top with whiteboard marker. You can get very thin whiteboard markers and I highly recommend magic sponges for the wiping them clean. They last ages, are (practically) mess free and work quicker than spray and wipe and less elbow grease then any cloth. You can get them from the cleaning section of most stores but they are so cheap on Ebay 
  • IPads can be used like a whiteboard or you can import pictures of the worksheet into programs like Show Me and have students work on them. They can even submit their completed sheet for marking. 
  • Maybe there is a website or app that has an activity along the lines of you worksheet that you could use instead. Students can easily access websites by scanning a QR code for the website you've found.
  • Could students share a sheet or even just look at a sheet displayed on a board for certain activities?
  • Below you can see where I have put sheets in plastic sleeves- works just as good as laminating but cheaper!

Does the sheet have to be this size?

  • The more pages a books has the more a publisher can charge and so it pays for them to spread out their work over multiple pages with (sometimes) excessive line spacing. Get to know your photocopying (or printer) settings and try reducing the page to half the size.
  • You can then have two to a page and cut in half or have two different pages on one. You can train students to use smaller pages and remember their eyesight is better than ours...they can handle the smaller font!
  • You can also cut and paste sheets to make them more to your liking. Don't like the bottom activity on this sheet? Cut it off and put something more meaningful there. It might take you a little more time but you can always keep the original for photocopying in years to come.
  • You can also print page toppers or just instructions and have student glue them to the top of their exercise book or similar.


A few final tips:
  • Don't photocopy stuff to be sent home that are unlikely to be used/seen by parents. Do parents really read the newsletter you send home? Could you email it instead? Is that student really going to do all that work their parent asked for the vacation they are taking their child out on? 
  • Don't copy busywork for students- have education games for early finishes.


 ⇨ Like us on Facebook
 ⇨ Follow us on Pinterest

Sunday 18 June 2017

10 FREE No Prep, Easy Lessons!

Are you struggling to plan every lesson every week? Are you getting to the afternoons and feelings sooooo worn out because of the amount of energy you put into teaching everyday?


Well, let me let you in on my little secret....

Every teacher needs to have at least one lesson every week that takes almost no time to plan or prep but that is still of high value to their students!

Having at least one lesson like this is sooo beneficial for helping you plan and teach all the other really valuable lessons that require more planning, preparation and in the moment energy from you.

So for you lucky ducks today I am going to give you ten lessons that are dead easy and can be used for ANY primary year level.

Ready for it?


Its reading a novel! 


I'm not talking about the novel that sits in your classroom and you read it when you have a spare few minutes to fill. I am taking about devoting a 50 minute lesson to it EVERY week.  The basic format is students listen to you read for 20 to 40 minute and then do a short activity (that requires no prep!) in the remaining time.

I've done this with year 1s, 2s, 3s, and even 6s and it works with all of them!

It definitely helps if you are animated while you read but if you are not or you need a break get a recorded version of the book you are reading!


Here are the reasons this is such a valuable lesson:


Students learn to sit
In our day and age this is a skill that actually requires teaching and practice!
Start off with shorter stints of reading, then longer sessions with movement breaks in between and then full listening sessions from there on out.

I'm serious when I say that I do this with my year 1s! I have even developed this skill in my 3 year old daughter! She picked up The BFG the other day and asked me to read it and before I knew it we were a quarter of the way through in ONE sitting!

They can do it, they just have to learn!

Students need to listen to adults reading
I could go on and on about the benefits of this point!
They learn about expression, fluency, expand their vocabulary, it helps develop a love of reading, it broadens their knowledge, it helps them write stories, it improves their imagination and the list goes on and on.

I don't have to tell you that most kids DO NOT get this at home.


Students learn to create images in their heads
'It's like a movie but in my head'.

Creating images is an important reading strategy that aids comprehension. This is a great chance to practice it.

Students can practice summarising and answering comprehension questions
Before each session I always ask students to summarise what has already happened. I will also stop occasionally to ask them questions such as predicting what will happen next or what a new word means.

Students expand their vocabulary

I have already mentioned this one but I think it is important enough to say again. Too often the books we use during guided reading or the texts we give them for other activities don't contain big, new words as they have to be at the students own reading level.

So lets get to the good stuff!

Ten FREE lessons you can just steal and teach!


I am a HUGE fan of Roald Dahl (who isn't!?!!!) so the first book I ALWAYS read my students is Matilda! So here is the book broken into 9 sections and 10 activities you can do!

Lesson 1: Read pages 1 to 23
Activity: Prior to reading, have students study the front cover and write a prediction about what they think it will be about. Really look at and discuss all the elements on the cover.

At the end of the lesson have students give their thoughts on Matilda's life. This could be done with an Inside/Outside Circle, Community Circle or just as a discussion as a whole class.

Lesson 2: Read pages 24 to 42
Activity: Have students choose one of the two pranks and write a retell about the events.

Lesson 3: Read pages 43 to 59
Activity: Draw a picture of Mr Wormword and around him put words (or phrases) that describe his character or appearance. For older students I would get them to write characteristics on one side and appearance on the other.

Lesson 4: Read pages 60-83
Activity: Have students complete a Venn Diagram comparing Miss Honey and Miss Trunchball. (I just get students to draw two large circles on paper but you could always photocopy them a template. If you are in one of those cool schools with ipads then there are apps you can use).

Lesson 5: Read pages 83 - 127
Activity: Re-read the description of the chokey again and have students draw a picture of it. Have them label the different features.

Lesson 6: Read pages 128- 152
Activity: Make a flowchart (or do a retell if that's too hard) of the events that happened in either Lavender's or Bruce's story. Again you could provide a template or use an app if getting the students to free hand it is too hard.

Lesson 7: Read 153 to 186
Activity: What would you do if you have Matilda's magic powers? Depending on the amount of time and your students you could either get them to write this as a story, write a paragraph or two on the idea or just jot the things down in a list.

Lesson 8: Read 186 - 209
Activity: The students write what they think Matilda is going to do or what she could do to get back at Miss Trunchball.

Lesson 9: Read 209 to the end
Activity: Have students do a values line where they stand along an imaginary line from one end of the classroom to the other. One end is loved the book, the other is hated the book. Have students give reason why they are standing where they are.

Also have students discuss the best and worst bits of the books. What they liked and didn't like.

You might also like to go back through each chapter and quickly summarise what happened and have students graph their interest with a line that goes up if they really like it or down if they didn't it.

Lesson 10: 
Activity: Write a book review about Matilda. Here is a great template for you to use. For year 1s I enlarge this to A3 and for older kids I do not give them a template at all.


So there you have it! The planning done for 10 of your lessons for next term! Let me know in the comments below if you are going to use this and if I get a good response I'll write another for a different book!
Like us me Facebook Follow us me Pinterest

Sunday 14 May 2017

Need help writing your general report comments?


I can remember the first time I had to write report comments. It was scary! What do I put in them? How long do they need to be? The pile of questions I had were long and I had no one I felt I could ask for help. My principal was a little scary and all the other teachers at the school were freshly graduated like me! Then I found a gold mine! The previous teacher had left a copy of her reports on the computer! I was saved!

This gave me a starting point, something to go off of and suddenly reports weren't so hard. Then the next year my reports were made up of 75% of the previous years report comments thanks to copy and paste!

Today I am going to show you what I put in my general comments and give you a few sample comments.
First though, a disclaimer. Different states and different schools have different expectations of what goes into comments (and what can't) so make sure you follow any guidelines given to you.

Length:

I aim for 80 - 100 words for my general comment. This usually works out to be about 7 sentences.

Opening Sentence:

I start my general comment off with three virtues that the student regularly displays. This starts the comments off to a nice happy tone and instantly gets the parents onside. This work especially well if you are at a school that has the virtues approach, if your school does the values approach then use that wording instead.


Topics to Cover:

Here are some things I like to include when I am writing general comments. I think about the student in question and the things that pop into my head first are usually the things that need to be included. If I am struggling to think of things this list gives me ideas for what to write.
  • ability to work in a group and leadership skills
  • listening skills (be careful not to step too much into speaking and listening here as that's for English)
  • ability to follow instructions
  • ability to finish tasks diligently, in a timely manner and work ethic
  • their relationships with other students
  • participation in discussions
  • confidence in their ability
I will often choose a day to really observe my students on these items and jot down what things I might like to cover in a student's general comment. Here is an observation grid template you can use. Write the name of each student on a separate square and any notes relating to that student go in their square. 

Goals:

I like to include a goal in my comments. Something the students can work towards or something that will help them improve. This can often follow a comment that states something the students is lacking or doesn't do.

Sandwich the negative:

You have probably heard this a million times in many areas of teaching and it is the same for report comments. Place any negative comments between two positive comments. This helps soften the blow and reads better to parents.

Relate to ABE's:

If you have marked students down for anything in the Attitudes, Behaviours and Efforts then this is also a great place to explain why. This is why I do the ABE's prior to doing the general comments and also in hard copy. Get my template for this in this blog post.

Closing Sentence:

I usually put a comment that ends things off nicely such as 'Keep up the good work, Bob!' or Congratulations on a great semester, Carol!'

Tips:

I make report writing easier by going opening up my last years comments next to my current document where I am writing my comments (Read about this document and get a copy here). I copy over an opening statement for each student and a final comment (changing the name when appropriate). I then read each sentence that remains from last year and ask myself 'does this sound like a student I currently have?'  If it does I copy it over and continue this till I have been through the entire documents. This gets my general comments over 50% complete.
I then go through each child one at a time and fill in any gaps using my my observation sheet and making sure I have said anything I need to. 

I hope this blog has helped you and motivated you to start (or finish your comments). Now to leave you with a few examples.

Cassie is a confident, responsible and honest student.   She works diligently to complete set tasks and is able to accept responsibility for, and show initiative in, decision making.  Cassie is a confident speaker in front of the class.  She enjoys asking questions and regularly joins in class discussions.  Cassie participates equally during group work.  Next semester I would like to see her take on more leadership roles.  It has been a pleasure having Cassie in the class this semester.

Carly has become a more forgiving, responsible and tolerant student this term. She needs to improve her ability to work quietly on independent tasks and avoid disrupting those around her.   When Carly commits herself she is able to produce good work.    However, she can be resistant to working depending on her mood and the difficulty of the task. Carly often has great ideas and questions and I would like to see her share these more readily with the class. Keep up the good work, Carly.

Jack is a friendly student who is working towards being more honest and diligent.  When faced with a challenging situation Jack will often exhibit a wide variety of poor behaviours in an attempt to avoid completing his work.   I would like to see him persevere when working on tasks and make good choices more frequently.  Next semester I would like to see him become more willing to seek help and to ‘have-a-go’ without prompting.   Jack enjoys participating in class discussion and asks thought provoking questions.  I look forward to watching him progress next semester.

Carl is a confident, responsible and honest student.   He is a quick learner and has made fantastic progress across the board.  Carl is able to work and learn independently and enjoys being presented with challenges.  He loves working in groups and takes on leadership roles.  Carl perseveres and achieves goals in amazingly quick time and is intrinsically motivated.  He has a cheeky sense of humour and a quick wit.  Carl frequently assists other students with their learning and is developing skills to better help them.  Congratulations on a great semester, Carl!

Like us on Facebook Follow us on Pinterest

Friday 28 April 2017

Make Report Writing as Easy as Pie!


I am in my 7th of teaching and I can honestly say I no longer fear reporting time! I use to dread it like the plague and spent way more time than I should stressing over it.
Over time I have found secrets to making it easier and I am going to share them all with you today. Some of them you may like and some of them you might not but I swear by them!


Tip Number 1: Start thinking about them early on! Don't be a person who puts them off to the last minute, starting now will ensure you get them done with minimal stress.

Tip Number 2: Find your motivator! I am a competitive person by heart so I compete with others at my school to be the first (or one of the first) to get their reports in. Perhaps you could find another teacher to work through reports with supporting each other and talking it through. Maybe think of rewards you can give yourself when the reports are completed or a reward for each section of report writing. Maybe that new handbag you've been eyeing off?

Tip Number 3: Work to a schedule! Spend a little while sitting down and planning out when you want to complete various sections. I start off with finding out the due date and write down each week prior to that.
Work out an order that helps you finish earlier and easier. For example I start off with what I consider to be the easiest part of report writing- the attitudes, behaviours and efforts which I complete in a checker box and colour code for ease of transferring the information later. Click here for a FREE download of this editable file. Starting with the easiest thing helps me get started and that's often the hardest part! Once complete it makes me feel like i've already accomplished something. Then I move onto the hardest or most consuming part which I find to be the general comments. Then I sandwich everything else in.

Tip Number 4: Plan out activities and assessments throughout the year that can be used to grade students. When you mark them assign them a grade and record it. This will help you get a sense of where your students are at and help confirm the grade you end up giving them. Remember what it was like in uni when you had all your assessments due at the same time? Don't do that to your students.

Tip Number 5: Make writing comments easier by only taking home one or two assessment pieces for each subject you write comments for. Picking a solid assessment piece that shows exactly what a student can and cannot do means you can simple pick out a few examples of each and write them down. Obviously you want your comments to be valid and taking that from one question would be wrong so make sure the assessment gives a few opportunities to prove if that can do a skills.
For maths I use these Mathematics Tests that you can get for each year level or strand. They are great because of the checklist on the front that shows you the Australian Curriculum outcomes and how students have achieved against them.


For reading I do running records and for writing I use a sample of a recount from their diary writing and a sample of the text type we have been studying. For speaking and listening I use a checklist that I fill out during observations. Trust your gut when deciding if the samples are accurate reflections of the student's ability. If it is not a true example go back to previous work and find a more representative sample.  Again, I use these assessments to assist me write the comments but I pull from a range of assessments to determine their grade.

Tip Number 6: I am sure you are forever hearing the phrase 'don't reinvent the wheel' when teaching. Well, don't! No one says you have to write every comment from the top of head. Get out last years reports and copy and paste relevant comments. When I do general comments I read through last years general comments and any sentences I read that make me think of a particular student from the current year I copy over.

Tip Number 7: Complete you comments in a simple word document. Here is a FREE copy of what I do mine in. This allows me to read across a student's comments to make sure they all align and I don't have to worry about signing into the portal to add them (or worry about it crashing and losing everything- I've heard of this happening!). It also makes it easier to proof read- especially by other people. When they are all done simple copy them over! Across the top row I keep a track of how many comments I have completely finished and a record of the word count I am aiming for. I choose certain colours to highlight the comments in when they are first roughly completely, when I have proofread them, when another person has proofread them and when they have been uploaded.

Tip Number 8: Make use of Portfolios! This is the word I use for the files that I store all the students major assessments in. They are easy to transport home and not as cumbersome as taking home umpteen scrapbooks and exercise books. They become a snap shop of you students are great to pull out for parent meetings! I even use them to show the students how far they have come!

Tip Number 9: Don't over think things! You need to trust your gut. I find this especially useful when filling out the ABEs. Your first instinct is usually correct, its usually when you over think things that time is wasted and you get stressed!

Tip Number 10: Know where to get help! Most states have samples of each grade online and many have banks of comments you can pull from. Other teachers are usually happy to moderate with you because it helps them just as much as you.

Here is my schedule for doing reports this year: 

Term 2
Week 1- revise work from term 1 to get students brain juices flowing (assessing here would not produce accurate results)
Week 2- Start major assessments (I start PM bench marks first as these take a lot of time to complete)
               Complete Attitude, Behaviour and Efforts (I find starting with the easiest thing gets me into the reporting mind set and starting is always the hardest part)
Week 3 - Maths assessments (I write my maths comments first so it makes sense to do the maths assessment first)
               Begin writing general comments (I go to them next because you don't need assessments to write them. I also find them the hardest and most time consuming. More tips to come soon on making these easier to write)
Week 4 - Writing assessments
                Finish writing general comments (Allowing more then one week to write comments cuts you some slack if you have a busy week or just can't get into the frame of mind)
                Start writing maths comments
Week 5 - Finish writing maths comments
                Start English comments (I leave English to last as I find it is the subject students can change most in within a few weeks so leaving them to last makes them more accurate)
Week 6- Finish English comments
               Enter grades onto reporting system including effort
Week 7- Buffer week for anything not yet finished. Check everything is still accurate.
               Reports due at end of week


While this is my schedule I often complete somethings more quickly and then bring up the schedule. I usually have my reports finished by week 5. Due to finishing this early I usually go back and have one more glance over them before they are printed to ensure all my comments and grades still accurately reflect the student.

Best of luck with your reports this term! Let me know in the comments if you have any tips of your own.

Like us on Facebook Follow us on Pinterest

Sunday 23 April 2017

Classroom Tour 2017


So this year I am in a classroom that was built in the late 1960's. It is very hard to make an old room look good but I have tried my best! Today I am going to take you on a tour of my classroom- cupboards and all!

My classroom is in a cluster of three classrooms which are divided by concertina dividers. I don't technically have a front door, I just have an entry way. My classroom also has some unusual features which I will show you as we go through. The upside to my room is that it is the biggest in the whole school and has stacks of storage. 

So let me first show you a quick overview of the room.


So here we are look back on the entry. Yes, the gap between the cupboard and the bulletin board is my entry way..... I have a welcome sign hanging above the entry which says goodbye on the back.
Get it here: Welcome Banner and Class Rule
This bookshelf has all my maths resources on it. They all belong to the school. 
 To the right of that is my storage cupboard. I have mostly filled it with things left in the room by previous teachers (I've thrown out a lot but you have to be careful you don't get rid of anything someones going to come looking for or the next teacher may actually use). Other than that I store all the recyclables students bring in for making things.

This is what I call 'the front' of my room as it has my main whiteboard.


At the top of the whiteboard are our classroom rules. The students I and I 'crafted' them together. I find students come after with pretty much the same rules year after year so I reuse these posters.
You can find them here: Classroom Rules

Next to my whiteboard is my weekly timetable. I love having this on display for the students, parents and I to refer to. We change particular items if needed each week but generally every week is the same.
You can get my timetable here: Weekly Timetable

The blackboard section flips open and on the inside I have my Reading Group Timetable. They are just laminated pieces of paper that I write on with whiteboard marker so I can change them easily when ever needed.

Next to that I have a sink. I LOVE having a sink in my room. So handy!

Above it I have my Vocabulary Word of the Day display. 
Get this display here: Vocabulary Display


I think this is a staple in just about every teacher's classroom. I use mine to store the photocopies and other smaller resources for lesson. Each drawer lines up with a subject on my timetable. I prefer these draws as I sometimes copy a whole terms work for a particular subject in advance and this gives me room to store it all. It's also easier for relief teachers to find things. On top of this I have my planning file filled with my weekly time tables. In the container are the WTW set for that week.

This is my mat area. I can't seem to get the layout of this section right yet. I have a T.V. screen in the background that I use at least once a day to display things on as well as using the movable white board with the stationery whiteboard being to the left of this. I would like students to be able to view all three from their desk when needed but it is hard to to lay that all out.
On the bottom shelf of the whiteboard I keep the schools reward system. On the top shelf I have the big books for that week and any additional resources I need handy for that day that don't fit in the draws.
Photos never seem to do my chairs justice but my mum and I covered them over the Summer holidays and they look awesome!


Behind my whiteboard I have a rainbow bunting I made myself from card which I cut and laminated then hung on string. This is 3 years old now (4 if you count the year in storage) and it's not showing any sign of wear.

Beneath that is my Write any Number Display and pencils display the names of common Colours and the Days of the Week.

Under that I have my word wall. Each coloured poster has one of my Alphabet Posters that I printed in B4 size and stuck in the corner. Then I have written the words in whiteboard marker that students came up with. 

I have four different colours of student chairs in my room (not by choice). I decided to stack them in their colours for more than just the reason of it looking pretty. I decided it would prevent students having issues getting a chair each morning and automatically ensures chair stacks never get too high. It does mean some students cross the whole room to stack a chair but it hasn't caused any issues yet.

I then have my Birthday Balloons. I love that I can put these in any sized space and it will fit. Spread them out more to fill a bigger space or overlap them to fit a smaller space.

You can see they are on my far corner next to my chimney. Wait, what? I have a chimney in my class! Yep!
It's not used for anything anymore so I wrapped it up in some orange material that was left behind in the classroom. I have a Spelling Poster (FREEBIE) and a Vowels Poster next to that.


Unfortuantly I do not have good enough camera skills to do this view justice. This is the back of my classroom where I have sheer rainbow curtains. 

Beneath the rainbow curtains I have my home readers (conveniently supplied in rainbow tubs by the school) and beneath that is shelving containing various paper and books. 

To the right of that I have my student draws. They keep their scrapbooks, spare supplies and other miscellaneous items here. On top are the pencil tins that some students choose to use over pencil tins. Unfortunately pencil tins are popular with the other teachers and are therefore on our book list. I give students the choice of what to use so parents don't feel they decorated a tin for nothing. As the year progresses I eventually persuade them all to move to pencil cases.  Pencil tins have their upsides but I find them more of a nuisance. 

This year I choose to use my Pencil Labels to label items in my classroom including these trays. 

Off to the right back side of my classroom is a alcove which is lined with cupboards. I am lucky that the second last teacher to have this room painted a lot of the bulletin boards purple! Which just so happens to be my favourite colour! I eventually plan to put up my Text Type Displays as we cover each text type during the year.

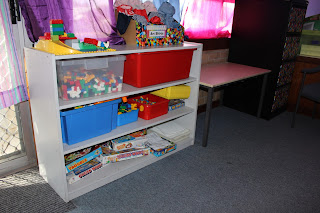
As this alcove helps muffle noise a little, I keep the things my students can use during free time here. On top we have our art shirts. I also have a desk around their in case I ever need a student to work in solitude or with another adult.

On top of the built in shelves I store things that won't fit in the cupboards such as our assembly mats, a large set of class whiteboards and all my tubs that store my laminated activities. 

I have also chucked a filing cabinet and a chair I do not use around here. 

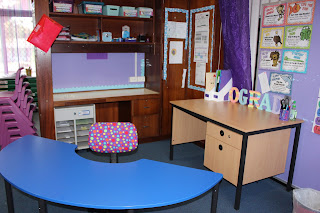
On the other side of that alcove is the teacher area. It has a built in desk that I do not use. I am still trying to think of an alternate use for it. 

I also have another teachers desk that I don't really use. 
 I have letters on top of this desk that spell out my last name. I decorated it with washi tape. I also keep my pens there, my assessment files and my mastery folders. 


Behind the teachers desk I have Reading Posters by Nicole Blunt and my Writing Goals Chart (FREEBIE)
In this corner I have my horseshoe desk. IT IS MY FAVOURITE PIECE OF FURNITURE EVER!!! If I didn't have one of these in my classroom I was actually going to buy myself one. They have changed the way I work but I might do a separate post on that another day. 

Below the built in teachers desk is this little shelving unit. I use to store all my note templates, late notes and absentee notes.
Above the desk I have a stack of trays for work to be finished by individual studets, work for marking, and work for gluing. I also have a tray for work still in progress as a whole class, my stationary and above that bulk student supplies like headphones, highlighters and clip boards. 
Displayed above that are my Punctuation Posters. 

In my cupboard I have my files including a file of all my Templates, school information and units and a few text books. I also have all my Words Their Way supplies and back up stationary. Behind the cupboard wall I have the DOTT timetable, my timetable and duty roster. 


To the other side of desk is my reading group resources including whiteboards, books and novelties. You can read more about how I approach guided reading here. 

Next up I have a very large, old map storage draw. In it is some large coloured card and I use the top of it to store projects and layout resources for students to collect. Then I have my book shelf.

Above the book shelf I have my current reward system and my Job Wheel.

Coming back around to the entrance to my classroom is a set of draws I use for my Spelling Lists.  You can read more about my spelling approach here. 


Here's a look inside some of my cupboards. Here I have my coloured card. I use a 5 draw system to store my A4 card. It helps keep the paper in nice shape and easy to access. 


This cupboard has tissue boxes, snap lock bags and PVA glue. 

Here is a look inside the containers where I store my laminated activities. 

This is my prize box. I use to have it in an actually box but it always became too messy and students would take forever selecting a prize. Having it sorted like this makes it much more convenient. I get most of prizes from ebay by searching for 'bulk toys'. 

 At the end of term 1 our carpets were being cleaned so I had to move the majority of the furniture out and have plans to try a different layout when I put it all back. I am forever changing the layout of my classroom. It keeps things interesting!
That brings us to the end of my classroom tour. I hope you picked up a few useful ideas along the way!
Like us on Facebook Follow us on Pinterest